Understanding gradients using SwiftUI
###What is the gradient?
Apple says it is an array of color stops each having parametric location value. In simple word, it is a color ramp or color progression that blends one into another and create a beautiful color effect.
###Gradient in SwiftUI
SwiftUI allow us to apply gradient color to its View using three different ways,
- Linear Gradient
- Radial Gradient
- Angular Gradient
Before we discuss each into detail let's understand some SwiftUI struct that we are going to use in the code examples,
Gradient
It represents an array of color stops and each color having a parametric location value. Gradient will be initialized with an array or Color or an array of Color.Stop. Note that Color.Stop represents one color stop in gradient.
Gradient(colors: [Color.red, Color.white])
Gradient(stops : [Color.Stop(color: Color.red, location: 0), Color.Stop(color: Color.white, location: 0)])
UnitPoint
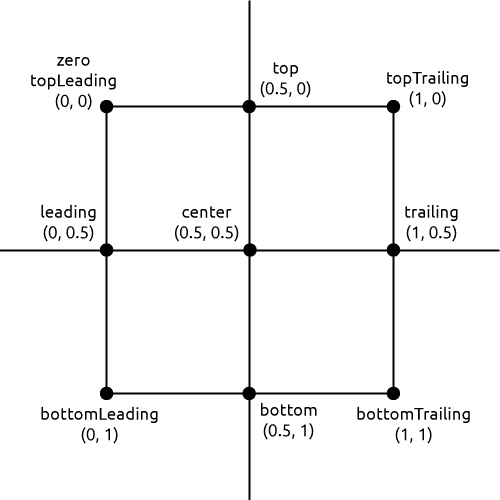
UnitPoint is represented by X and Y position in bounding rectangle shape. It ranges from 0 to 1. SwiftUI gives us predefine UnitPoints such as:
UnitPoint.zero // UnitPoint(x: 0, y: 0)
UnitPoint.center // UnitPoint(x: 0.5, y: 0.5)
UnitPoint.leading // UnitPoint(x: 0, y: 0.5)
UnitPoint.trailing // UnitPoint(x: 1, y: 0.5)
UnitPoint.top // UnitPoint(x: 0.5, y: 0)
UnitPoint.bottom // UnitPoint(x: 0.5, y: 1)
UnitPoint.topLeading // UnitPoint(x: 0, y: 0)
UnitPoint.topTrailing // UnitPoint(x: 1, y: 0)
UnitPoint.bottomLeading // UnitPoint(x: 0, y: 1)
UnitPoint.bottomTrailing // UnitPoint(x: 1, y: 1)
Consider this image for better understanding.

It was a basic understanding of Gradient and UnitPoint. Now let's discuss the main three gradients that SwiftUI provide us,
###1. Linear Gradient
A linear gradient is the most common and popular method to add gradient color in your View.
The gradient applies the color function along an axis, as defined by its start and end points. The gradient maps the unit-space points into the bounding rectangle of each shape filled with the gradient.
In simple words, a linear gradient is a progressive transition between two or more colors along with a straight line.
struct LinearGradientView: View {
    let gradient = Gradient(colors: [
        Color.black,
        Color.red
    ])

    var body: some View {
        VStack {
            HStack {

                Spacer()

                VStack(alignment: .center) {
                    LinearGradient(gradient: gradient, startPoint: .bottomLeading, endPoint: .topTrailing)
                    .frame(width: 100, height: 100)
                    .cornerRadius(20)

                    Text(".bottomLeading\nto\n.topTrailing")
                        .multilineTextAlignment(.center)
                }

                Spacer()

                VStack {
                    LinearGradient(gradient: gradient, startPoint: .bottomTrailing, endPoint: .topLeading)
                    .frame(width: 100, height: 100)
                    .cornerRadius(20)

                    Text(".bottomTrailing\nto\n.topLeading")
                        .multilineTextAlignment(.center)
                }

                Spacer()
            }

            HStack {
                Spacer()

                VStack(alignment: .center) {
                    LinearGradient(gradient: gradient, startPoint: .leading, endPoint: .trailing)
                    .frame(width: 100, height: 100)
                    .cornerRadius(20)

                    Text(".leading\nto\n.trailing")
                        .multilineTextAlignment(.center)
                }

                Spacer()

                VStack {
                    LinearGradient(gradient: gradient, startPoint: .trailing, endPoint: .leading)
                    .frame(width: 100, height: 100)
                    .cornerRadius(20)

                    Text(".trailing\nto\n.leading")
                        .multilineTextAlignment(.center)
                }
                Spacer()
            }

            HStack {
                Spacer()

                VStack(alignment: .center) {
                    LinearGradient(gradient: gradient, startPoint: .top, endPoint: .bottom)
                    .frame(width: 100, height: 100)
                    .cornerRadius(20)

                    Text(".top\nto\n.bottom")
                        .multilineTextAlignment(.center)
                }

                Spacer()

                VStack {
                    LinearGradient(gradient: gradient, startPoint: .bottom, endPoint: .top)
                    .frame(width: 100, height: 100)
                    .cornerRadius(20)

                    Text(".bottom\nto\n.top")
                        .multilineTextAlignment(.center)
                }
                Spacer()
            }
            Spacer()
        }
    }
}
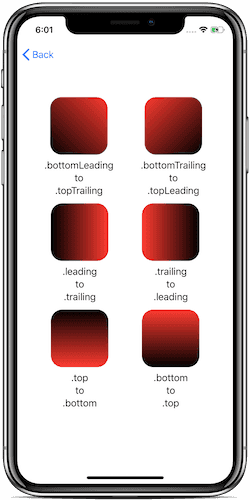
The output will look like this,

You can use a different combination of UnitPoint to get your exact matched gradient color.
###2. Radial Gradient
A radial gradient is a progressive transition between two or more colors that radiate from the center point.
The gradient applies the color function as the distance from a center point, scaled to fit within the defined start and end radii. The gradient maps the unit-space center point into the bounding rectangle of each shape filled with the gradient.
Here is the example,
struct RadialGradientView: View {
    let gradient = Gradient(colors: [
        Color.black,
        Color.red
    ])

    var body: some View {
        VStack {
            RadialGradient(gradient: gradient, center: .center, startRadius: 0.0, endRadius: 100.0)
                .frame(width: 200, height: 200)
                .cornerRadius(20)

            Text("width: 200, height: 200\ncornerRadius: 20\nstartRadius: 0.0\nendRadius: 100.0")
                .multilineTextAlignment(.center)
        }
    }
}
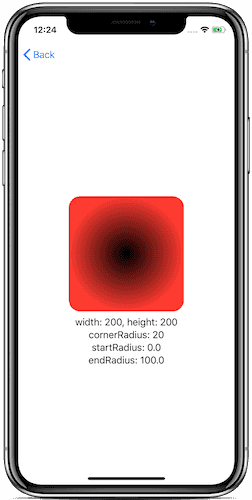
The output will look like this,

###3. Angular Gradient
An angular gradient is also known as a “conic” gradient. This gradient applies the color function as the angle changes, relative to a center point and defined start and end angles. If endAngle - startAngle > 2π, the gradient only draws the last complete turn. If endAngle - startAngle < 2π, the gradient fills the missing area with the colors defined by gradient locations one and zero, transitioning between the two halfway across the missing area. The gradient maps the unit-space center point into the bounding rectangle of each shape filled with the gradient.
In simple words, angular gradient sweeps counterclockwise around the starting point. The line between start and endpoint defines the angle.
Here is the example,
struct AngularGradientView: View {
    let gradient = Gradient(colors: [
        Color.black,
        Color.red
    ])

    var body: some View {
        VStack {

            //you can use either of following initialiser to create angular gradient

            //1 with center only initialise

            //AngularGradient(gradient: gradient, center: .center)
            //    .frame(width: 200, height: 200)
            //    .cornerRadius(20)

            //2 with center and angle initialise

            //AngularGradient(gradient: gradient, center: .center, angle: .degrees(0))
            //  .frame(width: 200, height: 200)
            //  .cornerRadius(20)

            //3 with center, start angle and end angle initialise

            AngularGradient(gradient: gradient, center: .center, startAngle: .degrees(0), endAngle: .degrees(360))
                .frame(width: 200, height: 200)
                .cornerRadius(20)

            Text("width: 200, height: 200\ncornerRadius: 20\nstartAngle: 0.0\nendAngle: 360.0")
            .multilineTextAlignment(.center)

        }
    }
}
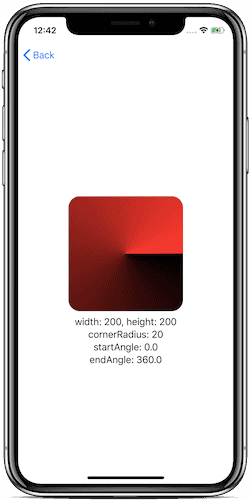
The output will look like this,

###Conclusion SwiftUI provides powerful gradients that you can use it to fill your views with required configurations. If you have any questions consider following me on Twitter and DM me your questions.
Thank you for reading! 😀 Stay safe and take care!